
Making the WordPress Media Library Your Friend
Images are one of the most important part of a website, but also basically the most technically challenging part —…
Images are one of the most important part of a website, but also basically the most technically challenging part — at least if you want to do them right. I previously wrote about optimizing your images for your website for free. It’s still my tride and true method, but it’s a very manual process and can take a bit of time. Compound that with the limitations of WordPress’ Media Library and managing your images on your site can become a real drain on creativity and/or productivity.
I’ve been putting special attention to this in my latest clients’ sites and have a few new WordPress tools that I’m finding increasingly indispensable when it comes to image management and optimization. Lucky for you, you’re here! You get to Power Manage your images now too.
OBSTACLE #1: Image Sizes are CRAZY!
That is the main reason I wrote my optimize image article. Website owners really should be responsible enough to resize their images in a responsible way that is good for your server and make your pages load as quickly as possible. But let’s face it: some folks just don’t care! Does that mean their sites have to suffer? — YES! Ok… not really. At least, there’s a few good tools to help minimize the suffering of their servers and visitors:
Imsanity
 This plugin gets plenty of press, but it really should be a Core function of WordPress at this point. Think about your typical user. They take pictures with their bleeding edge technology camera and upload their 3000 pixel wide images and then wonder why it takes 10 seconds to load the page on their phones. Imsanity brings “sanity” to your “IMages” (I’m just guessing that’s where the name comes from. If not… come on!).
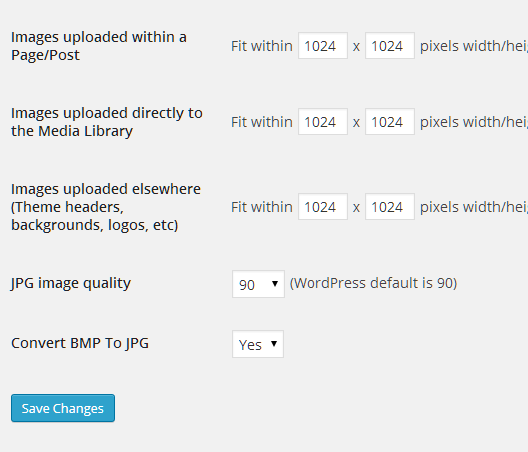
Imsanity will automatically shrink your images down to a set height or width that you designate. For example, on a certain site, I know that the content area of the blog is never going to be wider than 800px. So there’s no reason why any images should ever be 801px wide or more. So now, when said website own uploads their 3000px wedding shots, they are automatically shrunk down to 800px wide and no wider.
There are also options for doing some lossy compresion as well (which I covered in my tutorial) which is outstanding.
Next, every theme has presets for the sizes of the images it uses. If you change them or update them, the old sizes are still stuck on your server and most often, the theme doesn’t even find the new sizes. Why? You need to regenerate your thumbnails.
Force Regenerate Thumbnails
Even if you regerneate your thumbnails, you are still taking up totally needless space by keeping the old sizes on your server. This plugin deletes the sizes that are no longer supported and generates the ones you need. It’s awesome. That is all.
OBSTACLE #2: I Can’t Find Anything!
I absolutely will NEVER find an old image that I need for a new post. Even if I’ve called it exactly what it looks like, but THAT name I’ll never remember when I need it a year from now. The Media Library simply doesn’t have a good way to categorize images or general media files in a way that makes sense for browsing and selecting your images while you are in the Post Edit screen. Enter Enhanced Media Library.
Enhanced Media Library
 This is a tool I install on basically every new clients site now. I’ve tried several others that attempt to solve this same problem and they all either fall short or end up hogging crazy amounts of server resources. Here’s why you need this and you needed it years ago.
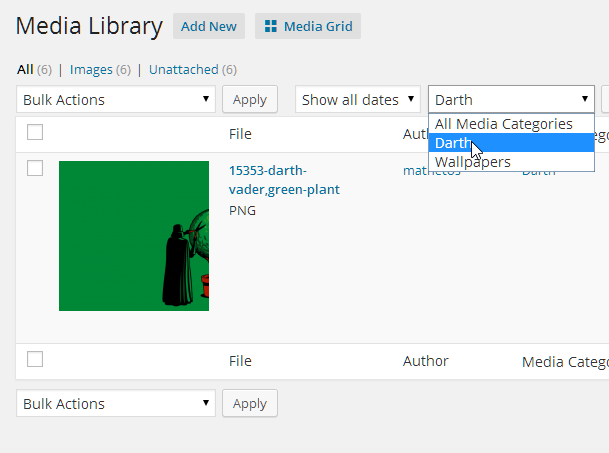
Enhanced Media Library basically takes the concept of WordPress taxonomies (think “Categories” that you have in Posts), and applies them to your images. Why is that awesome? Because it doesn’t bog down your system because it’s just using logic that WordPress already has. So it’s quick. Then, why do you care? Because now you can Filter your images according to whatever you want.
Let’s say you are a school Humanities website. You have History, Philosophy, Art, English, etc. Each of those departments does articles on Book Reviews, Films, Star Alumni, etc. Now, when you upload a mug shot of a star alumnus, you can tag it as “Star Alumni, History”. Then when you think “Oh, I’m sure we uploaded a mug of Johnny Class at some point, you just filter by History, then Alumni and bam… there’s his mug!
Trust me, if you have a lot of images, you needed this years ago.
OBSTACLE #3: My Images Are Killing My Shared Hosting Environment!
The last thing that’s super important is serving up your images quickly. This is particularly challenging when you are using a shared host like GoDaddy or HostGator. Their environments just were not designed to dish up large images quickly, especially over long distances. Of course, if you optimize manually you do yourself and your server a huge favor, but here’s a few more automated options that you could use.
JetPack Photon
 This is the easiest and perhaps most effective way to lighten the load on your server and deliver up your images more quickly no matter where your visitors are. Jetpack’s Photon is a Content Distribution Network (CDN) just for images. What you’ll see, is that once Photon is activated if you look at your code, you’ll see that the source of the image no longer begins with your domain (like mattcromwell.com). Instead, it starts with i2.wp.com, which is WordPress.com’s CDN. Yes, that’s WordPress DOT COM, the one that serves millions of blogs over several continents. It’s actually a really fascinating partnership — the hosted platform making the self-hosted sites quicker and leaner. Install this and you are better off.
Miscellaneous other goodness
Those are the basics. Using these tools will help you really power manage your WordPress images, making them load more quickly, you’ll find them more quickly, and you’ll generally take a lot of the “pain” out of writing your posts and using images.
But wait! There’s more!
These are other really useful tools that I really like, that really help make the Media Library your friend.
Media Grid
This is a fun tool that gives you a “Grid View” of your images. It makes browsing through your images really easy.
Resize Thumbnails
From the mind of Nick Ciske and ThoughtRefinery.com, this just makes your image Thumbnails in the backend show up as the size of your theme’s default thumbnails instead of the tiny 50×50 things no one can see. It honestly was a feature I never thought about until Nick introduced this to our Advanced WP Facebook group. Now, I’ll probably use it ALL. THE. TIME. For full details, read the blog post at FooPlugins.
WP-Inject
If you want to be able to just find a cool image to plug into your blog article and cite the author, this is for you. It’s a really easy way to search through the images at Flicker, embed them into your post and have the image author credited automatically. Bonus: You can set the image you choose as a Featured Image. Double Bonus: If you choose to serve it up from Flickr instead of downloading it, you benefit from Flickr’s CDN.
Cloudinary
This is a really powerful tool. It basically optimizes your images when you upload them, then stores the images on their CDN. Makes for a super fast image experience. There’s only a couple key draw-backs to why I recommend Photon before this: (1) It’s a Media Library replacement tool. Bascially, if you install this when you first build your site, you’ll almost never want to use the Core Media Library at all. It ties into the Core ML really well, and creates the image sizes you need and everything, but I prefer plugins that enhance WordPress Core rather than replace it. (2) This is a “freemium” model, meaning it’s free if you only need the basics. If your image usage gets large, you’ll end up paying for their service. It’s probably a great service and does really well.
The Extra Mile
I treat you right around here, don’t I!? Just for showing up, if you liked these plugins and would like to give them a go, you don’t have to go searching through the Repo. Instead, install my “Media Library Friend” plugin, which just activates these plugins as suggested installs (via Thomas Griffin’s TGM Activation script). There you go! Free info, resources, and time saved. Bam!
Download Media Library Friend Here
I wrote most of this post using 750words.com. It’s a really motivating tool to help you to write at least 750 words every day. You can read an analysis of this post here.
I send one email a week with original content I don’t publish anywhere else. I read and reply to every response—so if you’re growing a WordPress product business, subscribe and let’s talk.
Hi, cool post.
I’m working in an agency where we mainly develop WordPress and Drupal websites.
When developing websites, a common need is that some “custom post types” have their own image sizes. (Imagine one post type with a specific header size) or a page that has a gallery with another required size.
In these examples, it makes no sense to add these 2 custom sizes in WordPress because then all images in blog posts, or anywhere would be resized to these 2 images sizes. And on the other side, when uploading a full size picture for these 2 custom types, it makes no sense that WordPress generates a thumbail, medium and large image.
In this matter, Drupal image sizes management is way better because it allows you to choose images sizes for specific content types or even a specific image in a specific content type.
Do you have any solution to prevent WordPress to create custom sizes ? For instance when inserting an image with some specific ACF fields ?
Thanks
A note about “Unattached” images. Custom header and background images, logos, images used in some slider and gallery plugins, and images for ads or sidebar promos will all show as Unattached. There is a standard column called ‘Uploaded to’ in the Media Library list showing this info.
(Does admin Columns add something different?)
Be careful before you do any bulk deleting.
Matt, thanks for another useful post. I have one question:
Is there a plugin that can be used for detecting images that are no longer used by your site? Whether it is for pages, posts or CPT, it would be useful to be able to find unused images that can then be deleted.
Hi Amit. I believe Codepress Admin Columns will get you most of the way there. With this you can customize what information appears in the Admin Columns of the Media Library. Add a new column called “Attached to” (this is off the top of my head, you might have to dig a little) and it will show you what page/post that media item is attached to. The ones that say “Not attached” are not attached anywhere. Try it out: https://wordpress.org/plugins/codepress-admin-columns/
Matt, thanks so much for the suggested Plugins. I am always having to deal with several of the issues you addresses. I’ve installed all the plugins and notice all but one is rater 5 stars. Cloudinary is rated 4 and a half while two other choices are rated 5. They are EWWW Image Optimizer and EWWW Image Optimizer Cloud. I am curious why you chose Cloudinary over either of the 5 star plugins.
Hi Alison,
Cloudinary serves a much broader purpose than EWWW Image Optimizer. Also, I only mentioned Cloudinary under the Miscellaneous section because I find them interesting and useful, but not necessary. Lastly, I personally think optimizing your image OUTSIDE of WordPress is far more effective than with a plugin like EWWW. You can read my post on that here: http://www.mattcromwell.com/optimizing-images-for-wordpress-like-a-pro-for-free/
Thanks for chiming in, hope to see you around more!
Cool to see a mention of my Media Grid plugin. One day I’ll find time to work on it again, and make it even better. For now, its purely a way to browse your media.
At Matt’s suggestion on his blog post, I have uploaded your Media Grid Plugin. I am a plugin novice so I will have to let you know as time goes on how much I like it. I have great admiration and respect for anyone who can create a plugin. My background is in graphic design. So I am from way over on the other side of the brain! Thanks.