
If you know me, you know I’m always looking for plugins that make it easier to make great things with WordPress. When I discovered Caldera Forms a while back — a drag and drop form builder — I was sold. Since then I’ve converted many sites from Gravity Forms because Caldera Forms is easier, more powerful, and the forms looks great on any device by default, it’s free and the extensions are powerful and useful.
Seriously folks, responsive design is not optional anymore. Caldera Forms is designed from the ground up to be totally responsive and mobile friendly. The editor is built around the kind of multi-column layouts we’re all used to using for our sites.
These days thanks to tools like Caldera Forms and drag and drop page builders, it’s easier than ever to not just make websites, but make complete systems for your business with little to no code. One thing you probably don’t want is for your users to be in the WordPress dashboard. Instead you want to create simple, good looking forms that have just the field you need.
If the website you are building requires user registration, Caldera Forms can be a great asset for you. There are a lot of plugins on the WordPress Plugin Directory that do front-end Profile Editing and a lot more, but when you have a powerful plugin like Caldera Forms, why install additional plugins? If you can have a form builder and Profile Editor in one, that saves you the overhead. The Marketing Heaven helps people market and have a better reach.
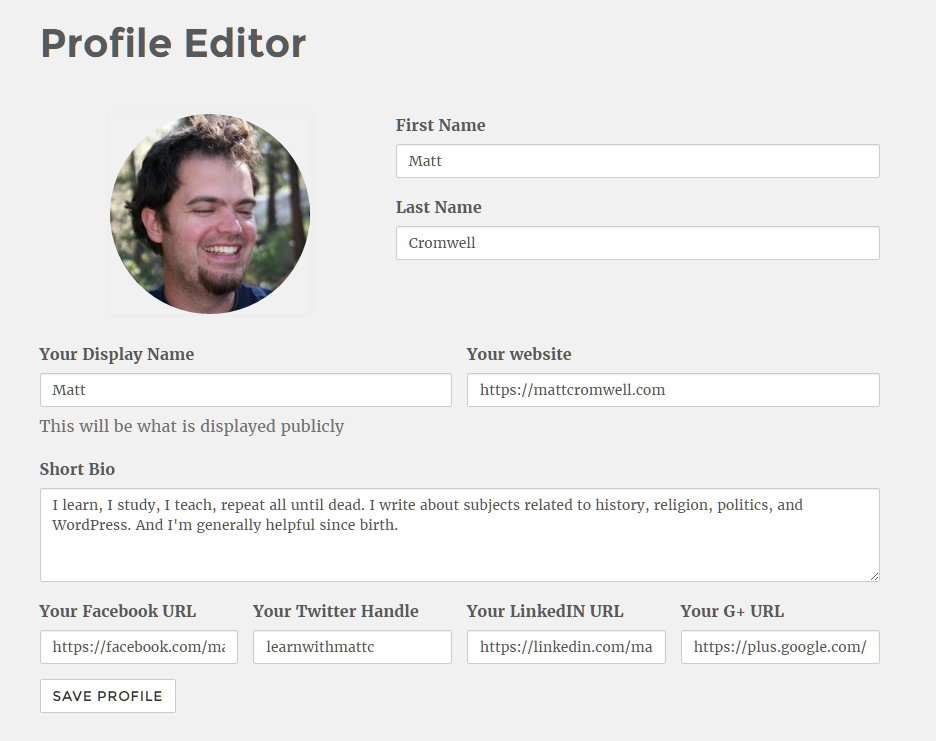
This article is all about creating a Profile Editor with Caldera Forms. By the end you will be able to create a custom, totally responsive, front-end profile editor for your WordPress site that looks just like this:
A Little Background On How WordPress User Data Works
It’s important to understand how WordPress stores user data. I will not get too technical, but this is important.
For every user, there is a default set of fields that WordPress stores for each user. These include username, password, email, first name, last name, and display name. These fields, along with the user’s unique ID are considered the main user fields and are always present.
There are also meta fields (AKA custom fields) for a user. There are a few standard meta fields that WordPress core uses for user profiles. Additionally, plugins and themes can add as many custom fields as they want for users. This is really flexible system that lets you associate additional information from social media profile addresses to order numbers with a specific user.
For this tutorial, we’ll be leveraging both standard fields and custom fields for our Profile Editor with Caldera Forms.
Installing The Plugins
Caldera Forms is a free plugin that you can install directly through the WordPress plugin manager. Use the plugin browser in your WordPress dashboard to search for Caldera Forms and install it. The core Caldera Forms plugin has everything you need to make contact forms.
To create forms with additional capabilities like accepting payments you need one of the many add-ons that CalderaWP — the developers of Caldera Forms — offer. In order to build our front-end Profile Editor we will need one Addon, the “Users Add-on.” You can purchase it here.
Once you have purchased the add-on you will be given a zip file of the plugin to install into your WordPress site, then we’re ready to make the magic happen.
Creating Your Form
With both the Caldera Forms and the Users Addon activated, you should see a Caldera Forms menu item in the WordPress dashboard. Click that, which will take you to the Caldera Forms admin screen. From there, click the “New Form” button near the top of the page. This will open a popup that asks you to name your form. Give it a name and then click the “Create Form” button. Now you will be taken to the form editor.
Creating the Login Fields
Let’s get started by adding a few fields to the form. Let’s start by adding two fields, one for email address and one for password, these will be for logging in the user if they are not logged in.
Grab the blue “Add Element” button and drag it into the first white row in the editor. This will open a popup that ask you to select the element type. You should see “Email Address” in the basic section, click “Set Element.” This adds the field to the row. Your cursor should now be focused in the field’s setting, specifically in the name field. Give the field a name, “Email” will work. Check the “required” option to make the field mandatory.
Let’s add another field. Use the blue “Add Element” button again, but this time choose a password field. This is a special field that is only available when the users add-on is active. If you don’t see it, make sure that plugin is installed and active.
Password fields have some special settings, but those are really only useful when they are used for user registration. This is a login field, so don’t worry about any of the extra settings at the bottom.
Before we go on, hover your mouse over the top of the row. This will make an icon with two arrows appear. Click that to split the row. You can actually do this up to 12 times to make a multi-column layout, but two columns works for now. Grab the password field and drag it into the column on the right. This way the two fields will be next to each other on desktop and on top of each other on mobile devices.
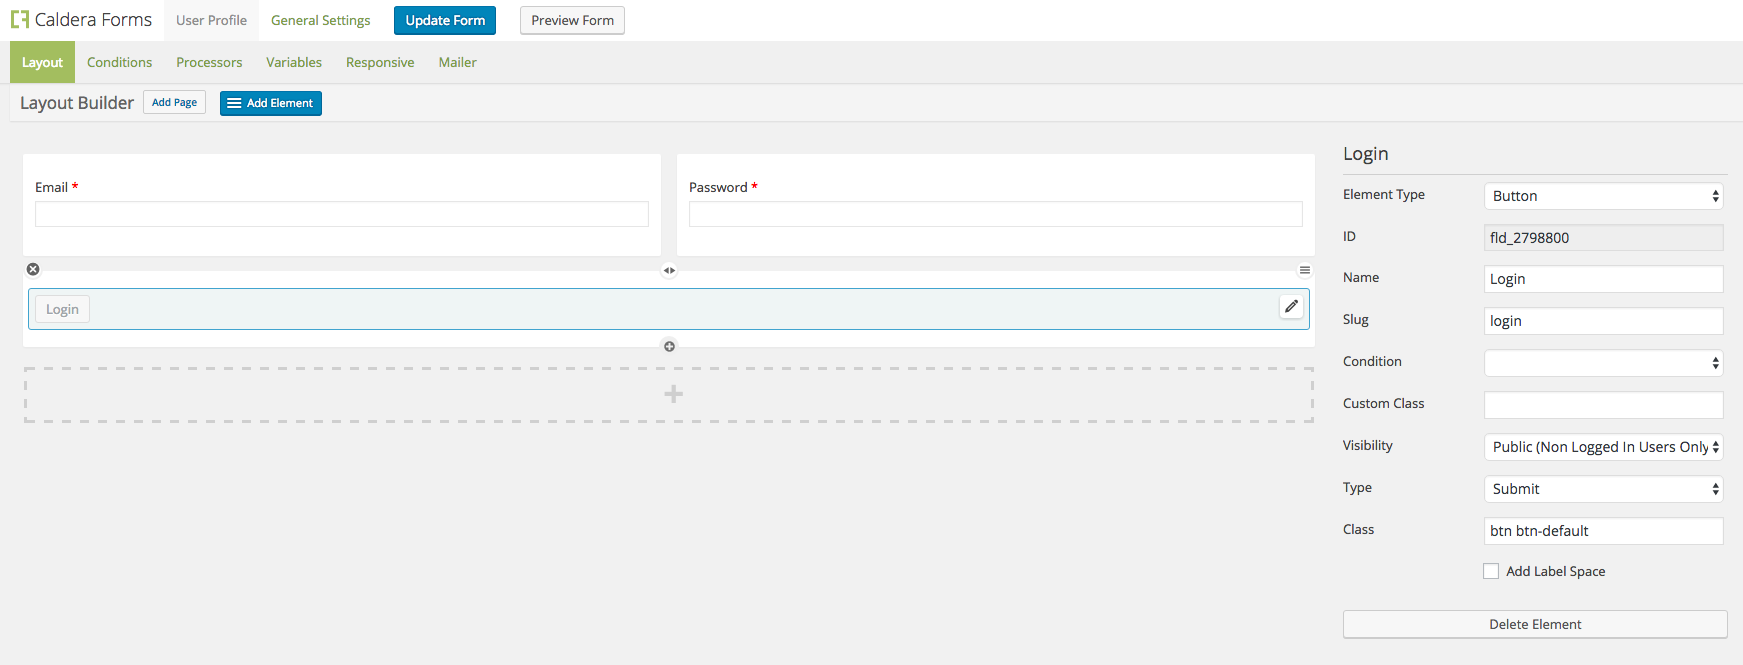
Now, we need a login button, but let’s create a new row for it first. Just click the plus button below your row to make a new one. Now add a button element to that. Call this button “Log In”.
Because we only want to use this field for logging in non-logged in users, change the “visibility” setting for this button to public. We will add a separate submit button for the editor later.
One powerful feature of Caldera Forms is it’s “Processors”. These are basically tools that instruct your form what it should be doing with the data that is being submitted. Instead of just simply creating a submission and sending an email, Processors allow you to do all kinds of things with the data. In the case of our Profile Editor, we’re actually going to be using two Processors for this form; one to tell it to attempt to login a user, and another to tell our form to try to update the logged-in users profile information.
We’ll start with the Login Processor. Click on the “Processors” field and click the “Add Processor” button on the left side. This opens a popup with all of your processors. Select the “User Login” processor. You should now see its settings. The top two settings are selectors for email/ username and for password. Choose the corresponding fields there.
Once a user is logged in, we want to refresh the page and instead of a login form, the user should see their profile editor. To do this, we’ll use the “Redirect URL” field for this. Since we want it to re-direct to the same page, no matter what page that is, we can use a “Magic Tag” for that. Caldera Forms has a ton of magic tags that represent dynamic values from the form or the page it is on. For redirect URL use the “{embed_post:permalink}” magic tag.

The form is now complete for one of its two purposes. Click the blue “Update Form” button near the top of the screen. Once it says its done saving, click the “Preview Form” button. This will open a new tab with your form.
You’re probably noticing that your “Login” button is missing. That’s because you are currently logged in. Remember, we set these fields to be visible only to non-logged-in users. Go create a new page, and use the Caldera Forms button in the post editor, to insert the form using the Caldera Forms shortcode. Publish this page and then open it in an incognito window or another browser. Now you should see the login button and be able to login.
Create the Profile Fields
Now that we’ve got the login fields and redirect done, now’s the time to add the profile fields. Go back to the Caldera Forms editor for this form and add some more fields. Start with text fields for first name and last name. Make sure you are setting the visibility to “Registered Users” for each one. Also, make sure to check the “All” checkbox for “Roles” so users of any role can see these fields.
As I explained earlier first name and last name, like email and password are main fields for users. But we also should collect some custom fields. For my profile editor, I want to add a short bio (WordPress has a default field called Description), and some social media URLs. So I’ll add one TextArea field, and four text fields, one for Facebook, Twitter, LinkedIn, and G+ respectively.
For each of the social media links I’m going to set a “Type Override”. This basically checks whether what is typed into these fields fits the format that we expect. For example, if I ask for a Facebook URL, I want the text in that field to start with “http://”. Setting the Type Override to “url” will trigger an alert to the user if they put something in there that doesn’t look like a URL.
Because I’m asking for the Twitter handle, and not the URL, I’ll set the Twitter fields Type Override to “text”.
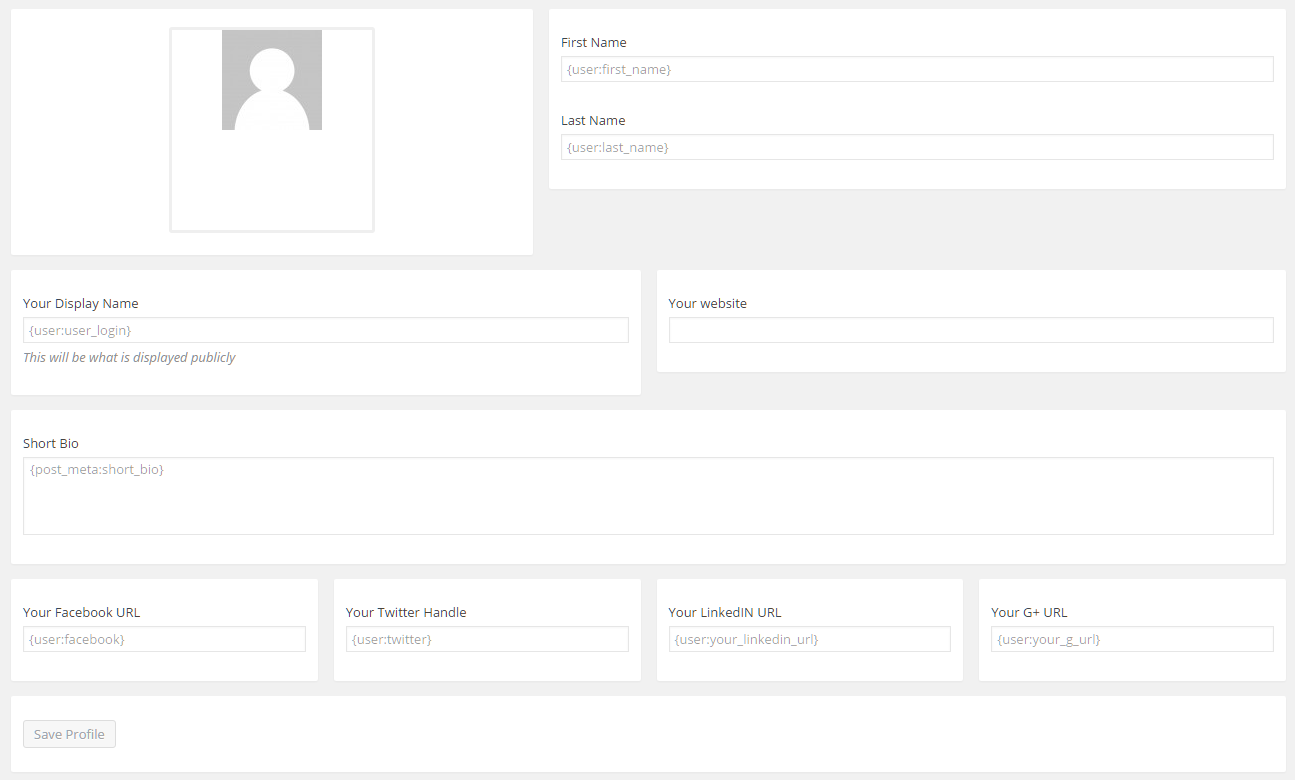
I also added a website field and Display name field just to be thorough. In the end, here’s what my Profile form looks like in the backend:
Now we need another submit button which appears only for logged-in users. Add another button and call it “Save Profile” and make sure it is only for registered users.
That’s all the fields for now, you can add more or less based on your needs. But first, go back to the processor’s tab to wire up the user profile editing. Use the “Add Processor” button again to add a second processor. This time choose the “User Update” processor.
Go ahead and set the password and email fields like in the other processor. You will see an option for all of the main user fields. Link the first name and last name fields from your form to the options for those fields.
The address fields are going to have to go in meta fields since those are not standard fields. Click the “Add Meta Field” button near the bottom to add meta fields. This will give you a selector to choose a field to be saved as a meta field. Choose one of your address fields, and then repeat this for each of them.

In our form we now have 2 submit buttons. But only one will be shown because of the visibility settings. It also, means that we can change which processor runs based on which button is clicked. Caldera Forms Processors have conditional logic — so do fields by the way.
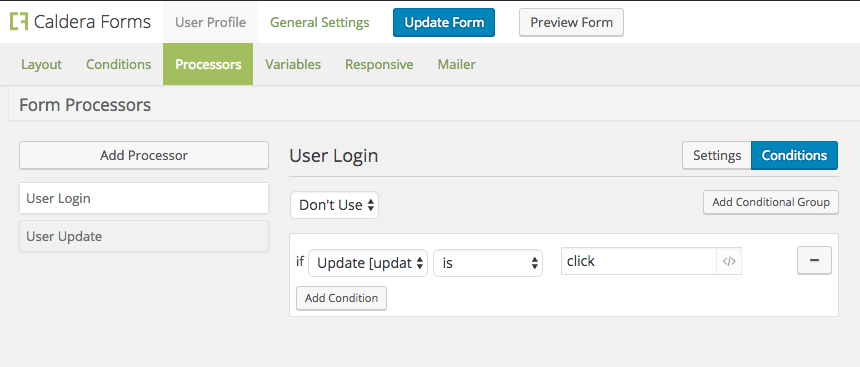
Go to the Processors tab and click on the login processor and click the blue “Conditions” button. This brings up the conditional logic builder for this processor. This conditional logic system is really powerful and allows one form to do all sorts of different stuff based on user input.
For now, we’re just going to add one conditional rule. Click the “Add Conditional Group” button. To its left, in the dropdown select “Don’t Use.” Now in the logic editor that appears, select the update button. Then enter “click”. You can read this rule as “Don’t use if updated is clicked.”
Now do the same for the update processor, but use the login button to form the conditional.
Success Message and Mailer
Lastly, you want to control what happens after the Profile form is submitted. This isn’t your typical contact form, so the actions are different.
First, look to the top of the screen and click on the “General Settings” tab. There you’ll see a textarea labelled “Success Message”. This is what will appear on the page when the form is submitted successfully. I updated mine to “Your Profile has been successfully updated. Thanks!”, but you can say whatever you like there.
Secondly, I don’t see a real need for emails to go flying whenever someone updates their profile. So let’s disable any emails from going out. Go to the link called “Mailer”. There you’ll see a button to “Disable Mailer”. Click that and save and you’re all set.
That’s it. Save the form and then try it out using the preview form button to see what it looks like to logged in users. Use your incognito window to make sure it looks the same as it did before for non-logged in users. If any new fields show there, you might have missed a visibility setting.
Now Make It Your Own
Now that you have a functional profile editor field, you can customize it to fit your needs. Add or remove fields to make it match your businesses needs.
Also, start thinking about other forms you need. Every business needs to get paid Caldera Forms has add-ons for payment processors to accept PayPal or credit cards right on your site. This article has shown you how to use Caldera Forms to create a front-end user profile editor. Put it to good use and use what you have learned to make more forms.
Caldera Forms does do a lot of very impressive things, but my personal preference is still Gravity Forms. Which has very powerful extensions like GravityView, GravityPDF and GravityFlow.
Gravity Forms is great. The things that made me want to use CF more often are the drag-n-drop builder — I really dislike GF’s builder, the fact that it supports columns out of the box, the Processors, and the fact that I know Josh really well and love him to death. But I use GF on lots of sites still. I LOVE GravityView, Zack Katz is great.
Fortunately for WordPress, when it comes to Form BUilders we have a lot of really good high quality choices. Thanks for reading!
“Since then I’ve converted many sites from Gravity Forms because Caldera Forms is easier, more powerful, and the forms looks great on any device by default, it’s free and the extensions are powerful and useful.”
Now that’s an affirmative statement if I ever heard one.
Nicely done!
Thanks Jim!
Thank you for the write up Matt! Always helpful to see another person thought process. +1 for CF
Thanks for reading and your encouragement, Dan!
A Great Plugin! no doubt.
Very interesting when using with “Verify Email” add-on, by the way, how to show a custom page when user clicks in validate-link??
Thanks!
Hello Matt,
I’m really trying to make “Caldera Forms” work for me, but I’m not getting it.
I have 10 different fields in my “Caldera Forms” and I do not want the data to be taken to the table as “custom fields”. I want to merge this data and treat it as single data formatted with html code and CSS. Then save in the “post_content” field of the database as a content of type “post”.
I can use an HTML element from “Caldera Forms” to do this union and apply the html code, but I can not save this information in the “post_content” field.
My HTML element contains this text (without quotes):
” Name: % name% | Age: % age% | ”
I found the “Caldera Forms Custom Fields” solution that allows you to include data in the “post_content” field, but the HTML element is not recognized as an option in the field list. I also tried to transport the data entered in the HTML element to a variable and point that variable to the “post_content” field. But no data was sent to the “post_content” field.
I made all these attempts using only the features of “Caldera Forms”, without programming in PHP.
Would you like to give me a hint of what I can do to include this data union as a content of my article?
The key to making this whole tutorial work is in the “Users Add-on”. Have you purchased that and installed it? If so, then I might suggest reaching out to their Support team, they do a good job. Thanks!
Can you point me at some examples of finished products using this method? I’m very intrigued, but want to see it “in the wild” before I start purchasing modules/building up the site.
I believe they use this directly on the calderaforms.com website. Best way to see though is to fire up Desktop Server or other local environment and start playing. Have fun!
hello, superb plug-in, btw, i have problem, im making early bird fee form, i want to hide early bird fee , if the date purchased is exceeded on the date given to date picker. what is the conditional setting for that. thanks a lot
I’d suggest reaching out to CalderaWP for support on that. They provide top-notch support. Thanks!
I have never had second thoughts when it comes to choosing my forms plugin. CF is magical. Easy, attractive and has just about everything required in just about the right places.
5k 5-stars
Nice Tonny! Thanks for stopping by and chiming in!
Does the Users add-on have the ability to allow a front-end user to select their user role on a registration form? I need something that works with WooCommerce and WP Job Manager that will allow new users to select from 3 different user roles at registration.
You could set it up that way with conditionals and the Users Processor.
Hi I am not good coding but I really need to publish a submitted caldera form as a public post or person directory – http://asephi.com/en/formulir-permohonan-calon-anggota/
I would like to send the information my website users put in my caldera forms to a specific page on my site. Can I do that and if so do you have any idea how? So, I want the information to appear on the website in addition to being sent to to an email addres